Before you start
5- Access to a Tags property in Adobe Experience Platform Data Collection with permission to edit extensions, data elements, rules and libraries
- The Tags embed code for a development environment already installed on a test page you control
- The Adobe Analytics extension installed and configured in the same property
- Working knowledge of JavaScript, the browser developer tools and the basic Tags concepts: extension, data element, rule, library
- Permission to edit the page template so you can add a script above the Tags embed code
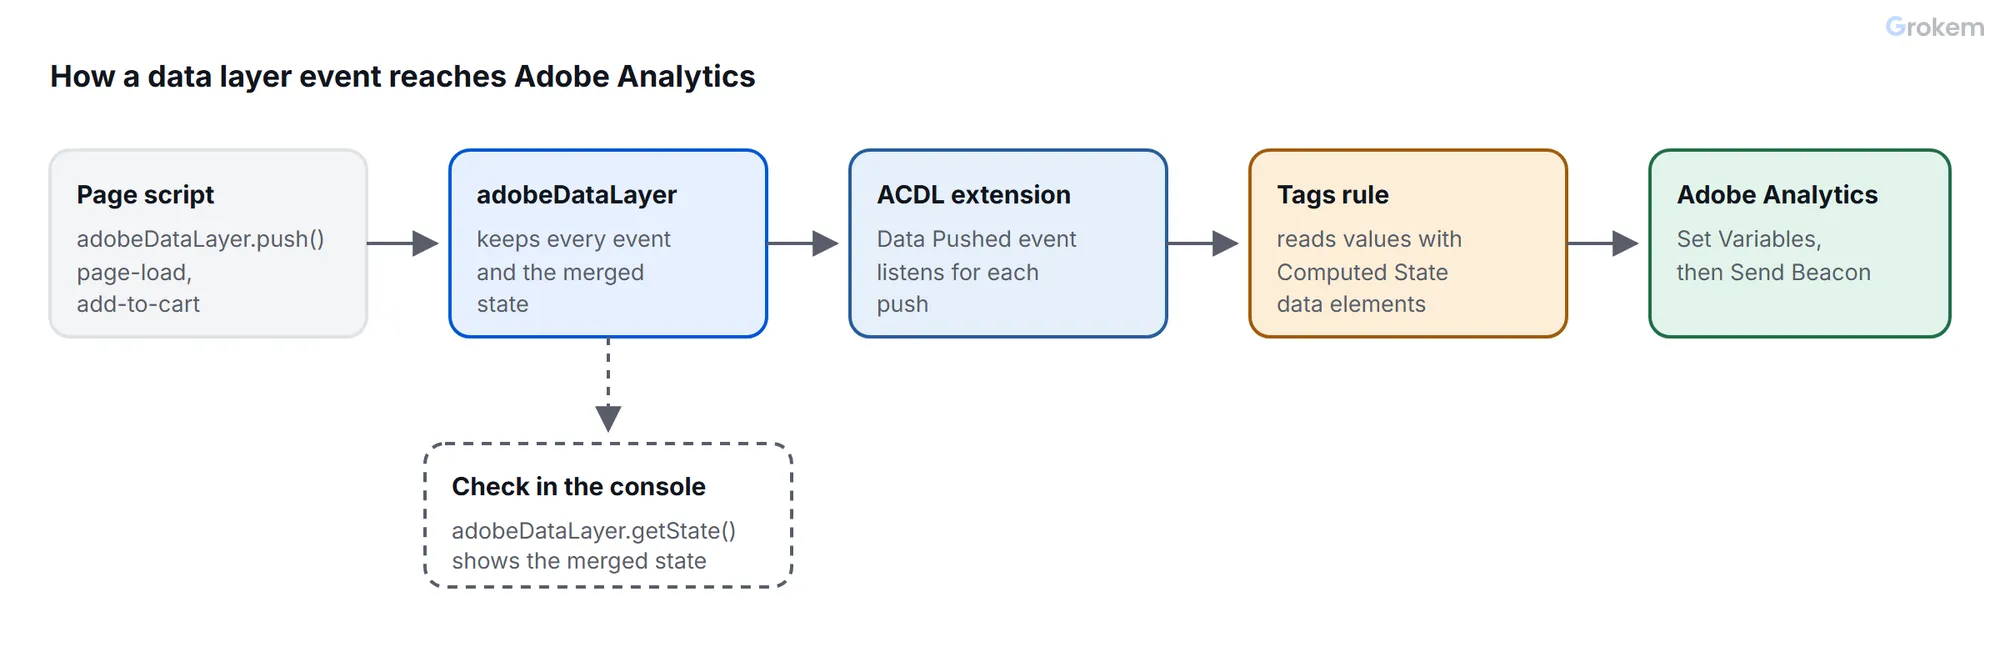
The Adobe Client Data Layer (ACDL) gives every script on a page one standard way to expose and read data. Your site pushes objects into an array named adobeDataLayer. Tags listens to those pushes and fires rules.
This tutorial builds a small, complete implementation. The page pushes a page-load event and an add-to-cart event. Two rules in Tags listen for them, read values through data elements and pass those values to the Adobe Analytics extension.
The design uses one page-load event with the conditions in the rule: you keep one rule for all pages and add conditions per page type, which is easier to maintain than one event name per page.
Version note. Tags is a hosted service, so there is no Tags version to pin. The ACDL extension bundles its own copy of the core library, and that copy can differ from the newest release in the GitHub repository. Check the installed extension versions in the Extensions tab of your property, and do not assume they match the GitHub releases.
Labels note. Field labels in the Tags interface change from time to time, for example the path field of the Computed State data element. Where a step names an option, match it to what your interface shows.
Step 1 of 12: Install the Adobe Client Data Layer extension
In the Data Collection interface, open your Tags property and go to Extensions. Open the catalog, filter for Adobe Client Data Layer, select Install, leave the default settings and select Save.
Why: the extension provides the listener event, the data elements and the actions used in the rest of this guide. With the default settings it creates a data layer named adobeDataLayer.
Do not rename the data layer unless you must. The extension view allows a different name, but the original adobeDataLayer object is still instantiated and then duplicated to the new name, which makes debugging harder.
Step 2 of 12: Initialize the data layer above the Tags embed code
Edit your page template so the data layer array exists before the Tags embed code loads. Then push the page data with an event key.
Why: items pushed before the library loads are queued in the array and processed once the extension starts. The line window.adobeDataLayer = window.adobeDataLayer || []; is the same pattern the AEM Core Components use. The event key is what lets a rule listen for this push by name.
Replace YOUR_TAGS_EMBED_CODE_URL with the embed code of your development environment.
<head>
  <script>
    window.adobeDataLayer = window.adobeDataLayer || [];
    window.adobeDataLayer.push({
      event: "page-load",
      page: {
        name: "home",
        type: "landing"
      }
    });
  </script>
  <script src="YOUR_TAGS_EMBED_CODE_URL" async></script>
</head>
Step 3 of 12: Push an interaction event from a click handler
Add a script that pushes an add-to-cart event when a visitor clicks a button marked with data-add-to-cart. Add the matching button to the page body.
Why: each user interaction type gets its own named event, such as "registration-start" or "add-to-cart". Rules then listen to these events by name. The product object travels with the event, so a data element can read it.
<button type="button" data-add-to-cart>Add to cart</button>

<script>
  document.addEventListener("click", function (e) {
    var button = e.target.closest("[data-add-to-cart]");
    if (!button) {
      return;
    }
    window.adobeDataLayer.push({
      event: "add-to-cart",
      product: {
        id: "SKU-1001",
        name: "Trail Backpack",
        price: 89.9
      }
    });
  });
</script>
Step 4 of 12: Create a Computed State data element for the page name
In Data Elements, add a new element named Page Name. Choose the Adobe Client Data Layer extension as the extension and Computed State as the data element type. Point it at the state path page.name.
Why: Computed State returns the merged state of everything pushed so far, so you read a value by its path and do not parse individual pushes. The data element offers the global state or a specific state: choose the specific state and enter the path.
Step 5 of 12: Create a Computed State data element for the product ID
Add a second data element named Product ID. Use the same extension and the Computed State type, with the path product.id.
Why: the add-to-cart rule needs the product that was just pushed. Because the state is merged, the value is available as soon as the push has been processed.
Step 6 of 12: Create the page-load rule with a Data Pushed event
In Rules, create a rule named ACDL - Page Load. Add an event, choose the Adobe Client Data Layer extension and select Data Pushed as the event type. Set it to listen for a specific event and enter page-load.
Why: the documentation describes three listening modes: all data changes, all events, and a specific event. A specific event is the most precise and avoids firing on unrelated pushes.
A push with data and an event key is tracked by the all-data-changes listener. A push that has only an event key and no data is not. If your page-load push carries no data, listen for the specific event, not for data changes.
If your interface offers a scope setting, the core library accepts past, future and all. Choose all here so the rule still fires when the push ran before the library loaded.
Step 7 of 12: Add Adobe Analytics actions to the page-load rule
In the same rule, add an action from the Adobe Analytics extension that sets variables. Map a page name variable to the data element %Page Name%. Add a second action that sends the beacon.
Why: the first action fills the Analytics variables from the data layer and the second sends them. The exact action and field labels come from the Adobe Analytics extension and can change with its version, so match them to what your interface shows. Follow the Adobe Analytics extension documentation on Experience League for them.
If you need page-type logic, add a condition on %Page Name% or on a second data element instead of creating another event.
Step 8 of 12: Create the add-to-cart rule
Create a rule named ACDL - Add To Cart. Add a Data Pushed event for the specific event add-to-cart. Add the Analytics actions that set variables, with the product variable mapped to %Product ID%, followed by the action that sends the beacon.
Why: this rule is independent of the page-load rule, so a missing product value cannot block the page view. Each event name maps to one rule, which keeps the rule list readable.
If you run rule components in sequence, check the open GitHub issue titled "add compatibility to Adobe Client Data Layer extension in Adobe Tags while using run rule components in sequence enabled" in the adobe-client-data-layer repository before you rely on that setting.
Step 9 of 12: Add the changes to a development library and build it
Open Publishing, select your development library, add all changed resources, save and build it.
Why: the rules and data elements run on the page only after the library that contains them is built for the environment whose embed code you installed. Confirm that this is the environment your test page loads.
Step 10 of 12: Inspect the merged state in the browser console
Load the test page, open the developer tools and run getState with and without a reference. Click the button, then run it again.
Why: getState(reference) returns the merged state of all pushed data, so it proves that your pushes arrived and merged as expected before you look at Tags at all. This is the same call the AEM Core Components documentation uses to inspect a page.
// Whole merged state
window.adobeDataLayer.getState();

// Only the page object
window.adobeDataLayer.getState("page");

// After clicking the button
window.adobeDataLayer.getState("product");
Step 11 of 12: Log events with a listener registered through a callback
Register a temporary listener in the console by pushing a function. Click the button to see the event logged. Use scope: "all" so past events are replayed.
Why: the core API says getState(), addEventListener() and removeEventListener() should be reached through a callback that guarantees the data layer is initialized, using adobeDataLayer.push(function (dl) { ... }). The options.scope value accepts past, future or all. Remove the listener afterwards so it does not stay active.
window.adobeDataLayer.push(function (dl) {
  function logEvent(event) {
    console.log("ACDL event received:", event);
  }
  dl.addEventListener("add-to-cart", logEvent, { scope: "all" });

  // Remove it again when you are done testing
  // dl.removeEventListener("add-to-cart", logEvent);
});
Step 12 of 12: Confirm the Analytics requests in the Network panel
Open the Network panel, reload the page and look for the Analytics request that the page-load rule sent. Click the button and look for the second request.
Why: a request per rule shows that the whole chain works: page push, listener, data element, Analytics action. Open each request and check that the page name and the product ID match the values you pushed.
Expected result
In the console, `window.adobeDataLayer.getState()` returns an object with a `page` object (`name: "home"`, `type: "landing"`). After you click the button, `getState("product")` returns the product object with `id` set to `SKU-1001`. The temporary listener logs the `add-to-cart` event object. In the Network panel you see one Analytics request on page load that carries the page name, and one more after the click that carries the product ID.
Troubleshooting
| Problem | Likely cause | Fix |
|---|---|---|
| `adobeDataLayer` is undefined in the console or the first push throws an error. | The array was not created before your script ran, or the script sits below code that uses it. | Start every inline script that pushes data with `window.adobeDataLayer = window.adobeDataLayer || [];` and place the initialization above the Tags embed code. |
| The page-load rule does not fire. | The event name in the rule differs from the `event` value in the push, the push has no `event` key, or the library you built is not the one the page loads. | Compare the strings `page-load` in the push and in the rule exactly. Confirm the `event` key exists. Confirm the development library was built and that the embed code points to that environment. |
| A rule that listens to all data changes does not fire for a push that only has an event key. | The all-data-changes listener does not track a push with an event and no data. | Listen for the specific event instead, or add a data object to the push. |
| A data element returns nothing. | The state path does not match the pushed structure, or the value was not pushed yet when the rule ran. | Run `getState()` in the console and copy the path from the real state. Make sure the rule listens for the event whose push contains the value. |
| A rule misses events that were pushed before the library loaded. | The listener scope is limited to future events. | Use the scope that covers past events (`past` or `all` in the core API) if your interface exposes the setting. |
| Code that uses a renamed data layer behaves oddly. | When you rename the data layer in the extension, the original `adobeDataLayer` is still instantiated and then duplicated to the new name. | Keep the default name `adobeDataLayer` unless you have a firm reason to change it, and use one name consistently in page code. |
| Rules behave unexpectedly when run rule components in sequence is enabled. | A GitHub issue in the adobe-client-data-layer repository requests compatibility with that setting, and the documentation pages used for this guide do not describe it. | Test with the setting off first, and read the issue for the current status. |
Frequently asked questions
Does the extension ship the newest core library from GitHub?
Not necessarily. The extension bundles its own core library version, which can be older than the newest release in the GitHub repository. Check the installed extension version in the Extensions tab.
Can I change the name of the data layer?
Yes, the extension view lets you change it. The original `adobeDataLayer` object is still instantiated and then duplicated to the new name, so the default name is the simpler choice.
Which listener options does the extension offer?
It can listen to all data changes, to all events, or to a specific event, and the listening can use different scopes. The core API scope values are `past`, `future` and `all`.
Why does my event-only push not trigger the all-data-changes listener?
That listener tracks pushes that carry data. A push with only an `event` key is not tracked by it. Listen for the specific event, or all events, instead.
How do I read a value from the data layer in code?
Call `adobeDataLayer.getState(reference)`, for example `getState("page")`. It returns the merged state of all pushed data. Reach it through a function pushed to the data layer when you need to be sure it is initialized.
How do I keep the data layer small in a single-page application?
The extension has an action that resets the data layer size and keeps the latest Computed State. The documentation pages used here do not give its exact interface labels, so check the extension in your property.
Where do I find the exact Analytics action labels?
In the Adobe Analytics extension documentation on Experience League. This guide names the actions by purpose, set variables and send beacon, because the labels are not covered by the pages used here.
Next steps
- Add a page-type condition to the page-load rule, so one event serves all page templates.
- Read the GitHub documentation of the core library for deleting data and updating an existing array through a push.
- For a single-page application, add the extension action that resets the data layer size so the array stays small.
- Use the push-object action of the extension to push JSON that contains data elements directly from a rule.
References
From Grokem: https://www.grokem.com/data/data-analytics/tag-management/adobe-client-data-layer-in-adobe-launch-tags-step-by-step-implementation