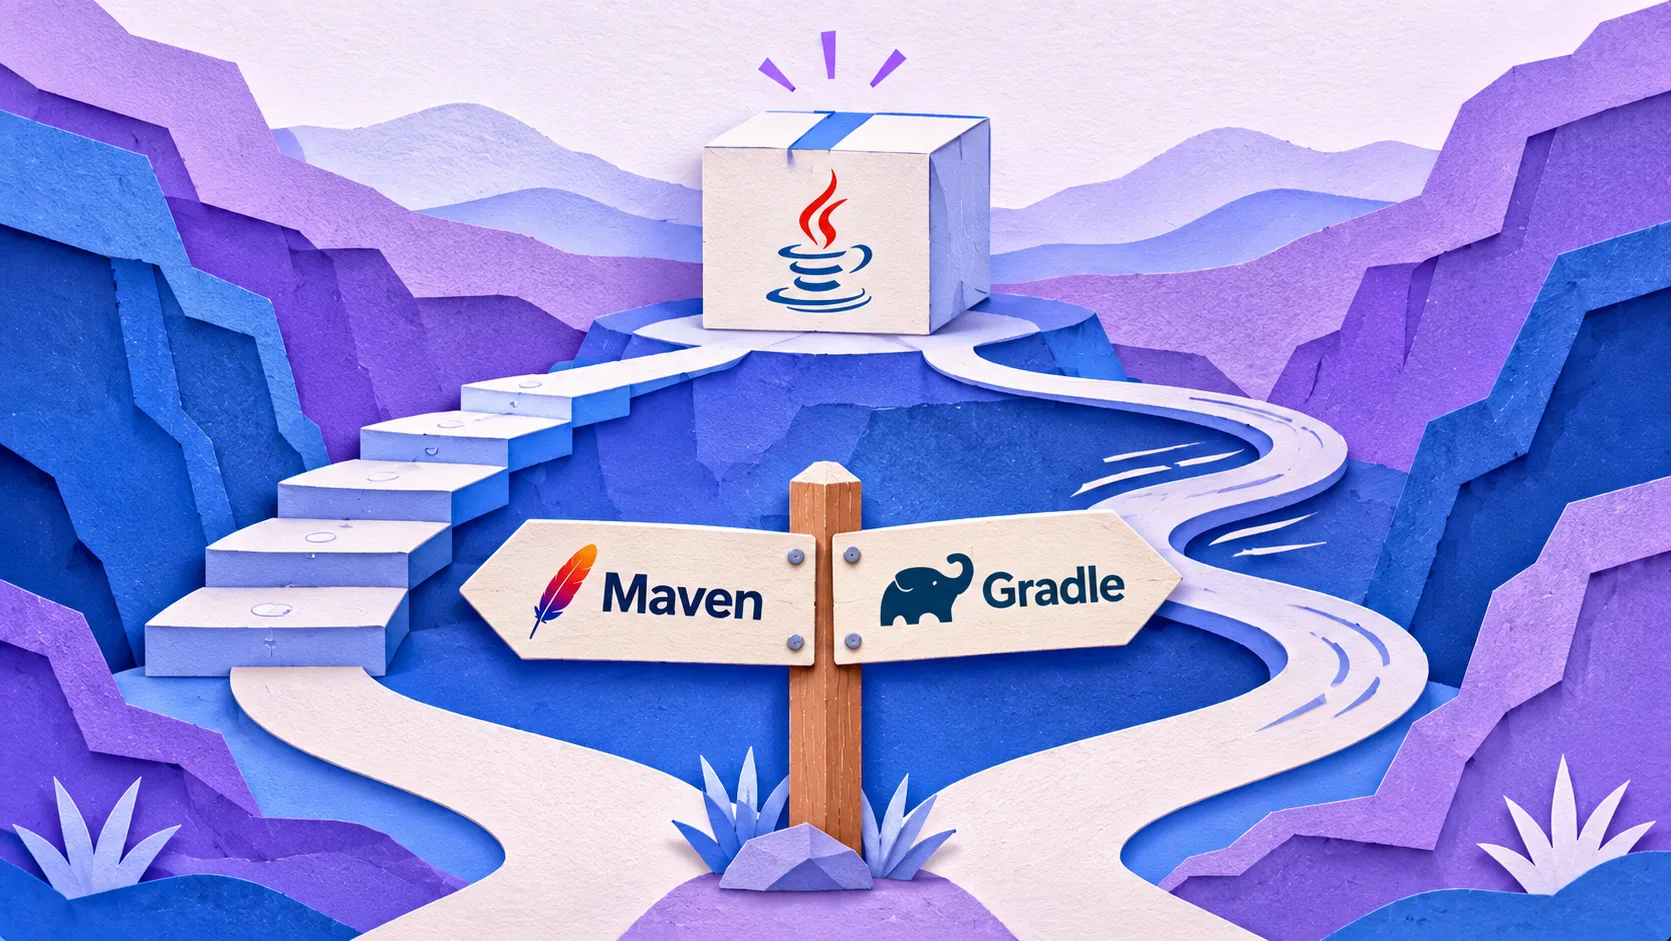
Maven and Gradle both build Java projects. They compile your code, run your tests, package a JAR and fetch dependencies. The difference for a beginner is how much each tool decides for you and how much it lets you change.
This comparison judges both tools on six criteria: conventions, how you describe the project, the build model, speed features, ecosystem fit and how easy it is to start. It ends with a recommendation for specific situations and a list of caveats.
Versions. Gradle details come from the Gradle User Manual for Gradle 9.4.0. The performance figures quoted later come from a reference project that the manual builds with Gradle 8.10 and then Gradle 8.13. No Maven version number is listed in the Maven pages used here, so check your installed version with the Maven documentation. The quickstart archetype used below is maven-archetype-quickstart version 1.5.
The short answer
If you want the shortest path to a working, predictable build, start with Maven. Its build is a fixed list of phases, and you learn a small set of commands that work on any Maven project.
If you expect to tune build speed, write custom build logic, or you already know the project will be large, start with Gradle. It gives you incremental builds, a build cache and parallel execution as documented features.
Both follow the same default directory layout, so your source code does not change if you switch later. Gradle states that it borrows several conventions from Apache Maven, uses the same default directory structure for source files and resources, and works with Maven-compatible repositories. That lowers the risk of choosing wrong.
What each tool is
Maven describes itself as an attempt to apply patterns to a project's build infrastructure, so that you follow a clear path of best practices. It is a project management and comprehension tool that helps manage builds, documentation, reporting, dependencies, SCMs, releases and distribution.
Gradle uses a convention-over-configuration approach for JVM projects. Its Java support applies to other JVM languages too, such as Kotlin, Groovy and Scala. Gradle is built around tasks and source sets, which you will meet below.
In short: Maven stresses one standard path. Gradle starts from similar conventions and then stresses customisation and speed.
Criterion 1: conventions and layout
Both tools expect the same default layout: production code in src/main/java, resources in src/main/resources and tests in src/test/java. The Gradle manual lists these locations when it explains the tasks the Java Library Plugin creates.
This matters for beginners. You do not have to configure where files live, and you can copy source folders between a Maven and a Gradle project without moving anything.
Gradle adds one idea on top: source sets. A source set groups source files and resources by type, such as application code, unit tests and integration tests. Each group has its own dependencies, classpath and output location. The main source set is created for you, which is why you see compileJava and implementation rather than compileMainJava and mainImplementation. You can ignore source sets until you need a second group of code, such as integration tests.
Verdict: a tie for layout. Gradle has one extra concept to learn later.
Criterion 2: how you describe the project
Maven keeps its configuration in a file named pom.xml. The one generated by the quickstart archetype starts with modelVersion 4.0.0, followed by the groupId, artifactId and further project details. It is XML, so it is verbose but easy to read in a fixed order.
Gradle uses a build script. The manual shows the same minimal Java build in two flavours, one with the backtick form java-library and one with the quoted form 'java-library'. Both are complete. This is the Kotlin-style version from the manual:
plugins {
    `java-library`
}

java {
    toolchain {
        languageVersion = JavaLanguageVersion.of(17)
    }
}

version = "1.2.1"
And this is the Groovy-style version of the same file:
plugins {
    id 'java-library'
}

java {
    toolchain {
        languageVersion = JavaLanguageVersion.of(17)
    }
}

version = '1.2.1'
The manual recommends setting the toolchain and the version even though both are optional. The toolchain protects you from the project being built with different Java versions on different machines. The version is used in archive names, so the JAR becomes <project>-<version>.jar.
For a beginner, the Gradle file is shorter. The cost is that you must decide between two script styles and learn plugin names.
Verdict: Gradle is shorter, Maven is more uniform.
Criterion 3: the build model
This is the biggest difference in daily use.
Maven works with a lifecycle. There are three built-in lifecycles: default, clean and site. The default lifecycle is a fixed list of phases: validate, compile, test, package, verify, install and deploy. When you call a phase, Maven runs every earlier phase first. You only name the last one you want.
The Maven guide gives this advice: pick the phase that matches your outcome. For a JAR, run package. For unit tests, run test. If you are unsure, run verify, which also runs integration tests and any quality checks bound to that phase.
Phases are carried out by plugin goals. A goal is a finer unit of work that can be bound to zero or more phases, or called directly, as in mvn clean dependency:copy-dependencies package.
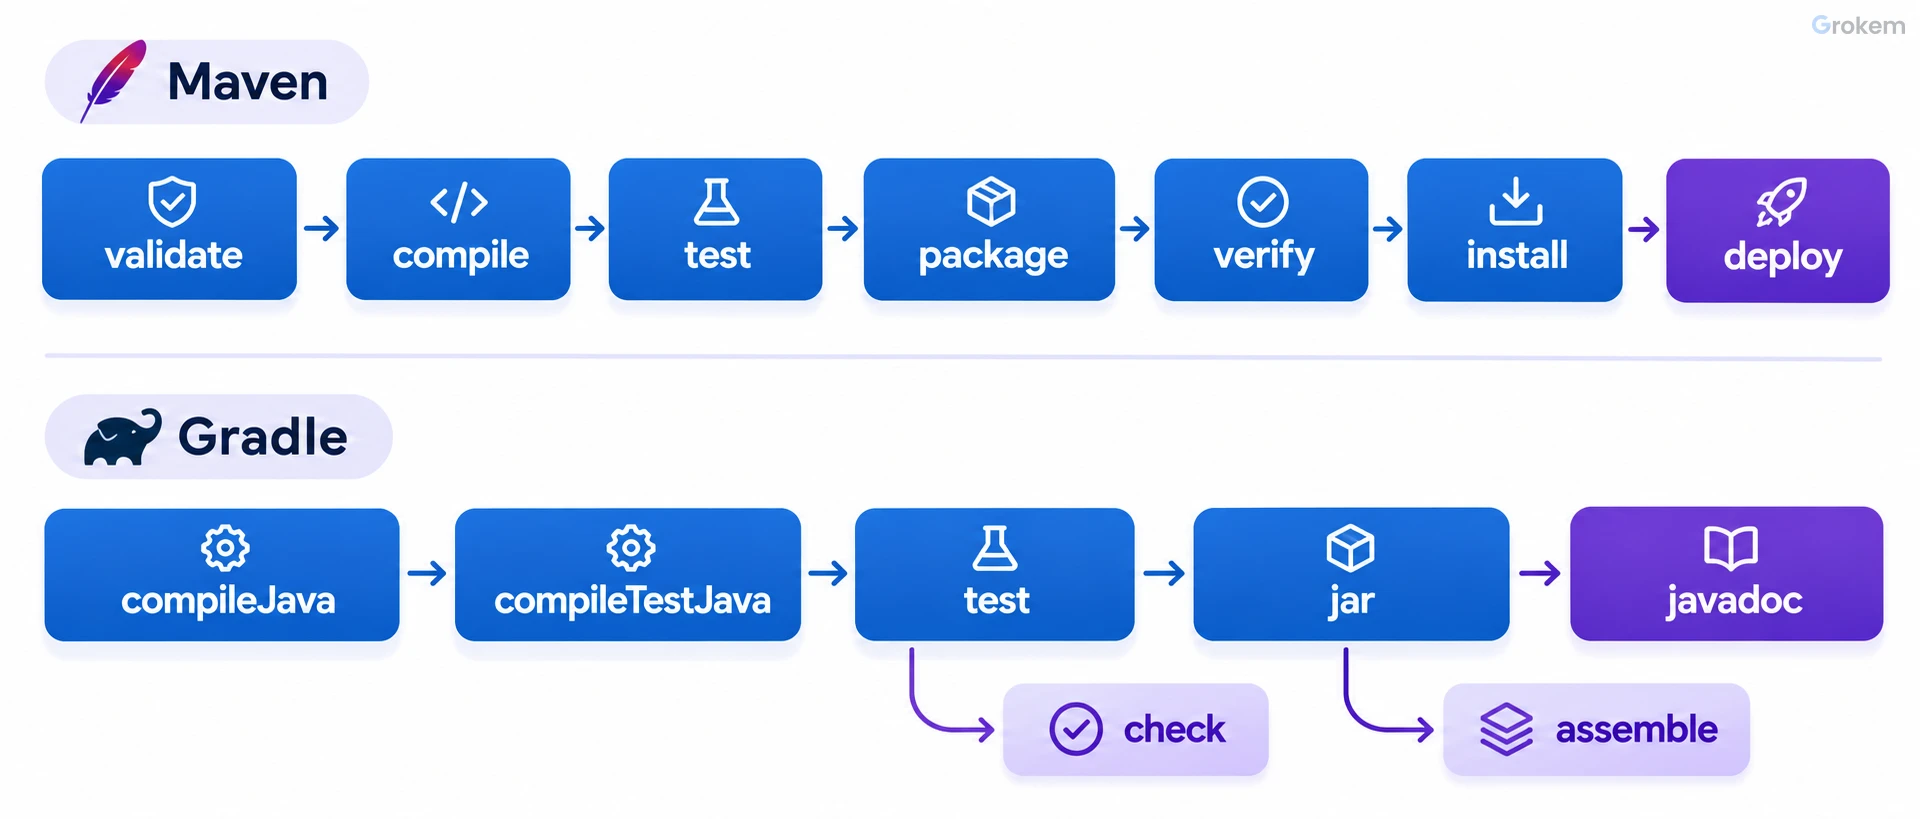
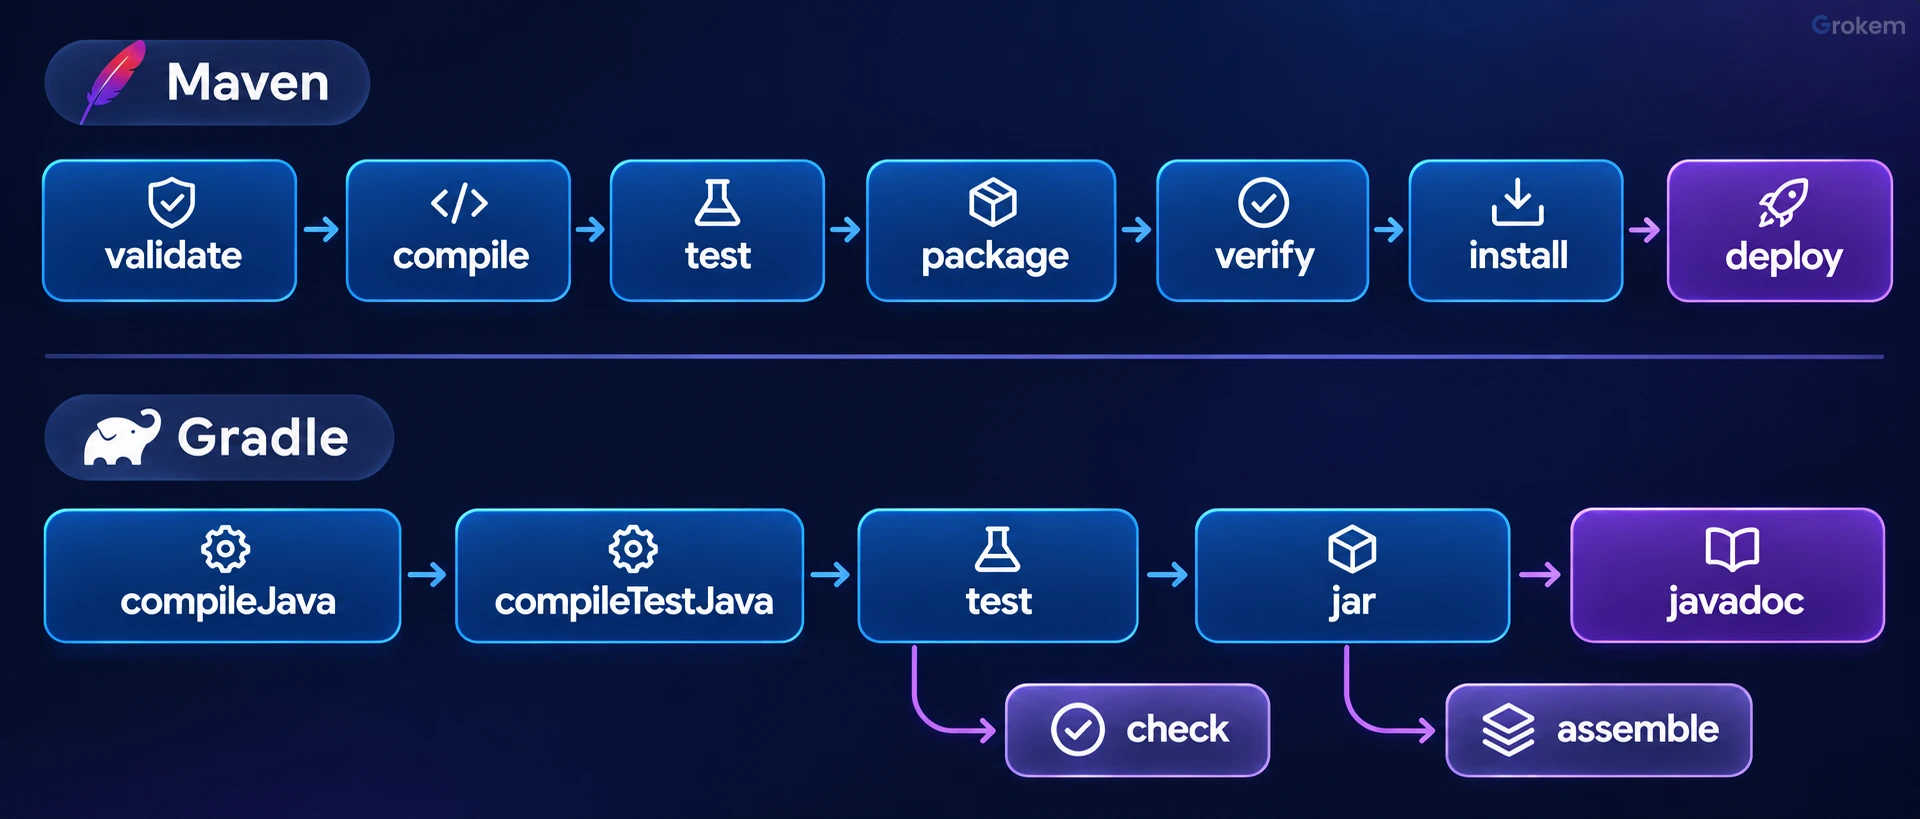
Gradle works with tasks. Applying the Java Library Plugin gives you compileJava, compileTestJava, test, jar and javadoc. The plugin also hooks them into the standard lifecycle tasks of the Base Plugin: jar is attached to assemble and test is attached to check.
In practice, a Maven beginner memorises phase names, and a Gradle beginner learns task names and how tasks depend on each other. Maven's model is more rigid and therefore easier to predict. Gradle's model is more flexible and therefore gives you more room to customise.
Verdict: Maven is easier to predict. Gradle is easier to extend.
Criterion 4: speed features
Gradle documents several features that reduce build time.
- Incremental builds skip a task when its inputs and outputs have not changed since the previous build. They are always enabled. Tasks print
UP-TO-DATEwhen skipped for this reason. - Build cache stores earlier results and restores them when needed, for example after you switch to a branch that was built before. Restored tasks print
FROM-CACHE. You can share the cache across a team to speed up local and CI builds. - Parallel execution runs tasks from independent subprojects at the same time. By default Gradle runs only one task at a time.
- Gradle Daemon and configuration cache are listed as further recommendations on the performance page. The page does not detail them in the part used here, so read it before relying on them.
To see task labels, run a task with verbose console output:
./gradlew compileJava --console=verbose
To try the build cache and parallel execution:
./gradlew compileJava --build-cache
./gradlew clean build --parallel
To make parallel execution the default, add this line to gradle.properties:
org.gradle.parallel=true
The Gradle performance page also gives a data point. A project created with gradle init (a Java 21 application and library using Kotlin build files) builds in 21 seconds with Gradle 8.10 in the page's Build Scan. After the project is updated to Gradle 8.13, ./gradlew clean build takes 8 seconds, and with --parallel it takes 7 seconds. You can update the wrapper with gradle :wrapper --gradle-version X.X, where X.X is the version you want.
The Maven pages used for this comparison do not describe an equivalent of these features, and they give no timings. So this article does not claim that Gradle is faster than Maven. It only says that Gradle documents speed features you can switch on and measure.
Verdict: Gradle has documented speed tools. Maven is not rated here.
Criterion 5: ecosystem and team fit
Maven stresses teamwork. Its guide says Maven works for small projects but shines in helping teams focus on what the stakeholders need while Maven handles the build infrastructure. Its lifecycle means any team member can build any Maven project with a small set of commands. In a build environment, mvn clean deploy cleanly builds and deploys artifacts to the shared repository, and in a multi-module project Maven goes into every subproject and runs the same phases.
Gradle covers many project types. Its manual has chapters for libraries, applications, web applications, Java EE applications and Java platforms, plus other JVM languages. Because it works with Maven-compatible repositories, you keep access to the same published libraries.
Note that this is not a full list of integrations. The pages used here do not compare IDE support, plugin counts or CI setup. Check your IDE and CI documentation before you commit.
Verdict: both fit teams. Gradle gives broader project-type coverage in its manual. Maven gives a stricter shared routine.
Criterion 6: getting started
Maven creates a project from a template called an archetype. This single command creates a directory named my-app that contains a pom.xml:
mvn archetype:generate -DgroupId=com.mycompany.app -DartifactId=my-app -DarchetypeArtifactId=maven-archetype-quickstart -DarchetypeVersion=1.5 -DinteractiveMode=false
Then build it with the phase Maven recommends when you are unsure:
cd my-app
mvn verify
Gradle projects start with gradle init, which the performance page mentions as the way its reference project was created. The pages used here do not list the prompts or options of gradle init, so see the Gradle User Manual for the details. Once a project has the Gradle Wrapper, you build with ./gradlew, so teammates do not need to install Gradle themselves.
Maven's getting started guide is written for first-time users and also works as a cookbook, with sections on compiling, testing, packaging a JAR, plugins, resources, dependencies and multi-project builds. The Gradle manual is organised the same way for Java projects: source sets, dependencies, compiling, resources, tests and packaging.
Verdict: a tie. Both have beginner-friendly official paths.
Side-by-side summary
| Criterion | Maven | Gradle |
|---|---|---|
| Default layout | src/main/java, src/test/java |
Same layout |
| Project file | pom.xml (XML) |
Build script (two styles shown in the manual) |
| Build model | Fixed lifecycle of phases | Tasks attached to lifecycle tasks such as assemble and check |
| Typical beginner command | mvn verify |
./gradlew build |
| Speed features in the pages used | Not covered | Incremental builds, build cache, parallel execution |
| Project creation | archetype:generate |
gradle init |
| Repositories | Maven repositories | Maven-compatible repositories |
What we compared
- Conventions and default directory layout
- How the project is described (file format and length)
- Build model: lifecycle phases or tasks
- Documented speed features
- Ecosystem and team fit
- Ease of getting started for a beginner
Recommendation
Choose Maven if you are new to build tools, want one fixed routine (`mvn verify`, `mvn clean deploy`), work in a team that values predictability, or want the most uniform project files. Choose Gradle if you want shorter build files, expect a multi-project build where parallel execution and the build cache could save time, or need to customise the build. If you are still unsure, pick Maven for a first learning project and Gradle for a project where build time is already a concern. Because both use the same default directory layout and Gradle works with Maven-compatible repositories, switching later is realistic.
Caveats
- The Maven pages used here give no timings, so this article cannot say which tool builds faster. Measure your own project.
- The 21 second, 8 second and 7 second figures come from one reference project in the Gradle manual and depend on that project and its hardware. They compare Gradle 8.10 with Gradle 8.13, not Gradle with Maven.
- No Maven version number is listed in the pages used, so check the Maven documentation for the version you install.
- Gradle build scripts come in two styles in the manual. Pick one and stay consistent, because mixing them confuses beginners.
- IDE support, plugin availability and CI integration are not compared here. Check them against your own tools before you decide.
- Gradle Daemon and configuration cache are named in the performance page, but this article does not explain them. Read the page before enabling them.
Frequently asked questions
Can I switch from Maven to Gradle later?
The two tools use the same default directory structure for source files and resources, and Gradle works with Maven-compatible repositories. Your code layout and dependency sources carry over. The build file itself has to be rewritten. The pages used here do not describe an automated conversion, so check the Gradle User Manual.
Is Gradle faster than Maven?
The official pages used here do not compare them. Gradle documents incremental builds, a build cache and parallel execution, and its performance page shows one reference project dropping from 21 seconds with Gradle 8.10 to 8 seconds with Gradle 8.13. Measure your own project with both tools.
Which command builds my project?
In Maven, run `mvn verify` when unsure, or `package` for a JAR. In Gradle, `./gradlew clean build` is the command the performance page uses to time a full build.
Do I need to install Gradle on every machine?
If your project includes the Gradle Wrapper, you run `./gradlew`. The wrapper can be updated with `gradle :wrapper --gradle-version X.X`.
Which Java version does my build use?
In Gradle you can pin it with a toolchain, for example `JavaLanguageVersion.of(17)`. The manual recommends this to avoid builds on different Java versions. For Maven, see the official guide on targeting a Java version.
What is the difference between a Maven phase and a goal?
A phase is a stage in the lifecycle, such as compile or package. A goal is a specific plugin task that can be bound to phases or run directly, such as `dependency:copy-dependencies`.
References
From Grokem: https://www.grokem.com/programming/application-development/maven-vs-gradle-for-a-new-java-project-how-a-beginner-should-choose